
When you buy something through one of the links on our site, we may earn an affiliate commission.
Are you tired of asking your hiking partner to grab your water bottle for you every time you need a drink? Is awkwardly reaching backwards into your pack inconvenient because you’re not double jointed? Do you clearly not own a hydration bladder with a straw?
Then you need a good ol’ fashioned DIY water bottle holder!
Here are 5 easy ways to jury-rig your household items into a convenient backpacking strap bottle holder.
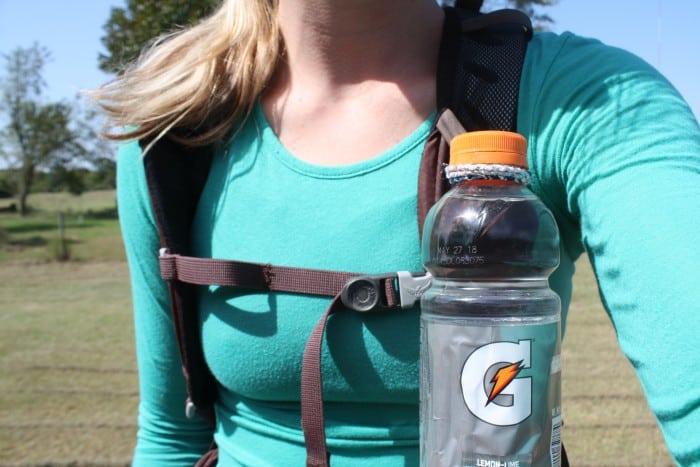
1. Use Your Backpack’s Trekking Pole Attachment OR Buy One Online for Cheap

Before we dive deep into the world of DIY, analyze your equipment. If you own a backpacking backpack like my Osprey Mira, there is a trekking pole attachment already attached to the shoulder strap. You can improvise this into a makeshift hiking water bottle holder.
If you’re backpack doesn’t have a built-in trekking pole holder, you can buy some on Amazon. You can attach them to the tiny loops on your backpack’s shoulder straps. (Double check that your pack has some first!)
For this method, it helps if you have a grooved hiking water bottle like those from Gatorade.
2. Turn 2 Hairbands into a Simple DIY Water Bottle Holder
You or your little sister probably has a million elastic hairbands lying around somewhere. Dig in the couch cushions and find two of them. (If you don’t have any, rubber bands will work as well but aren’t as durable.)
Once you’ve got a couple, weave them together like so:
Then slide the bands through a shoulder loop on your pack, and use the two loops made by your bands to secure the top of your bottle in place.

3. Use a Koozie & a Zip Tie

While not the most ultralight, this method is easy to set up and I can almost guarantee that you already have all the materials on hand.
(Bonus: It keeps your beer…er…water cold.)
Grab a zip tie and your favorite koozie that you don’t mind cutting up. Then follow these 3 easy steps:
1. Slice a small hole a half inch from the top of the koozie. (Make sure your hole is at least this far away from the top, as you don’t want the fabric to rip through.)

2. Zip your zip tie through the hole.

3. Slide the tie through the shoulder strap of your pack, cinch ‘er up, and hit the trail! (This method can also work as a makeshift holster for your hip belt for holding things like bear spray.)

4. Make a Paracord (or Shoelace) Jug Knot
Ready for expert mode?
I’m a firm believer that paracord saves lives, so I almost always have one on my person in the shape of a tactical, fashionable paracord bracelet. If you feel the same way, this jug knot method may work well for you. If you don’t have paracord but still want to try, an old shoelace will work just fine.
To tie the aptly named jug knot, take a deep breath and follow the video below. It is by far the simplest and most concise set of instructions for this moderately difficult knot.
Once that’s done, secure your bottle onto your belt or shoulder strap. You can cinch the shoulder strap for extra security.

5. Buy an Aqua Clip
This final method isn’t DIY, but when all else fails, it’s nice to know that there are cheap products designed to solve your exact problem. The fancy-shmansy Aqua Clip is designed to hold your bottle in place, works with most lightweight plastic water bottles and takes all of two seconds to set up.
Is $3 worth hiding from your fear of DIY? Maybe.
4 Alternatives to Attaching Your Water Bottle to Your Backpack Strap
Not every backpack is well-suited to a shoulder-strap water bottle holder.
If yours is one of them, here are some alternatives to consider:
1. Store Your Water Bottle in Your Backpack’s Side or Back Pockets
I know what you’re thinking: “Thanks, Captain Obvious.”
But before you look your remaining options (that involve spending money), give this alternative some consideration.
Can you modify your pack’s side or back pocket to make it easier to reach your bottle? Can you learn to put up with having to remove your pack to get to your water bottle?
2. Get a Taller Water Bottle

A lot of hikers and backpackers have trouble using their backpack’s side water bottle pockets because they simply can’t reach the bottle. Or, they can reach it, but they have to contort their arms uncomfortably to pull it out. Unfortunately, this is a common problem with hiking and backpacking packs.
Before considering a new backpack, try out a taller water bottle like a LIFEWTR 1L or Smartwater 1L. These are some of the most popular water bottles among hikers and backpackers because they’re ultralight yet durable.
The downside to tall water bottles is they are more prone to sliding out of side pockets when you bend over. (Ergh, trade-offs!)
3. Get a Hydration Bladder

Hydration bladders are water pouches that are stored in your pack. They have a water tube that you feed through your pack that you can drink from directly.
99Boulders editor-in-chief, Alex Beale, recommends this hydration bladder from Platypus. There are also plenty of good options at REI.
Hydration bladders (aka hydration reservoirs) are a popular way to drink water on the trail because of how convenient they are. You only need to use one hand to drink and can take a swig without even slowing down.
Your pack might already have a built-in hydration bladder pouch. Or you could use your pack’s main compartment to store one. Check to see if there’s a notch you can feed the water tube through. (Though if not you can easily make a tiny opening yourself with some scissors.)
4. Get a New Backpack
You knew this was coming, didn’t you?
If being able to conveniently drink water matters A LOT to you — and to many hikers it does — then you may have to consider getting a new pack.
Here are some features to look for when buying:
- Trekking pole attachments. See our #1 way for attaching your bottle to your pack (at the beginning of this article).
- Well-placed side pockets. These might better allow you to pull out your water bottle from your side pocket without removing your pack. If you decide to also use a tall water bottle, such as a LIFEWTR 1L, make sure they’re deep enough, too.
- Hydration bladder compartment. This is an important feature if you decide you want to forego water bottles entirely and switch to drinking from a hydration bladder.
- Hydration bladder. Some packs come with an included hydration bladder designed specifically for the pack’s hydration bladder compartment. No need to bother picking out a separate hydration bladder!
I personally use the Osprey Mira, which has a built-in hydration compartment and included hydration bladder. It also has well-placed side pockets and trekking pole attachments! SO MANY WAYS TO DRINK WATER.
The men’s version is called the Osprey Manta. It has similar features.


